
A few scratches on the hands this weekend from spending a couple of days rewiring the “aisle 3” solar array. There’s some experimenting going on, some changes to system design, and a couple of useful hints to share.
Ham radio and drone-lifted ham antenna adventures are on hold this week as other, more pressing work of Life has come to the foreground. Oh, and the #22 AWG wire was mis-shipped, so maybe that will show up one of these days.
Solar Panel Aging
People don’t spend enough time on maintenance. I am as guilty as anyone, I suppose. But the best reason to do maintenance is time and money. Nowhere is this any more evident than in solar panels and related “balance of system” components.
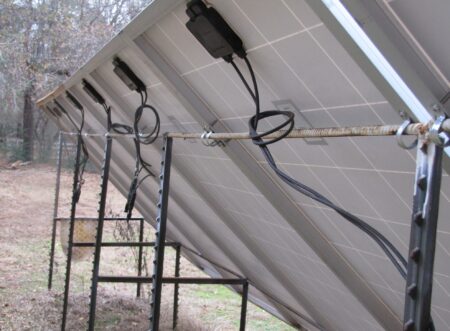
The maintenance problem begins when you do your installation. Long-time readers will remember that when we went with our first rack of panels (2008_ we cobbled up a simple array mounting design out of readily available materials. On a tree farm, those are T-post (of the sort used for fencing) and rebar (reinforcing bar) used for all kinds of neat projects.
The basic rack around here consists of lower case “h” components. Two hunks of T-post “nailed into the dirt” with a post driver. Then a horizontal piece between them to maintain spacing. These lower case “h” units are then spaced out 2-3 feet apart and mounting rails are constructed of 5/8 rebar, which was the largest we could get (inexpensively) at the time. And honestly, it’s been a great design.
There is one problem which developed late last year on the first set of panels deployed. The “normal” top of T-post welds are supposed to be aging like this one:
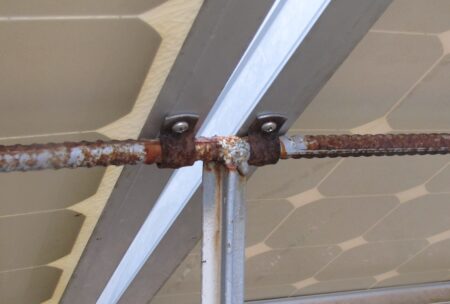
However, for reasons unknown to me (though bad workmanship on my part and a poor weld is obvious now) one of the welds broke loose. As a result, the panel dropped onto the T-post, so an emergency repair – in the form of a small C-clamp – was employed to spread the weight of the panel a bit.
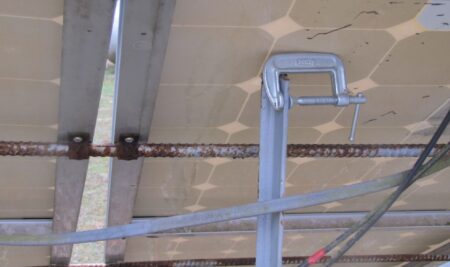
You can see, looking at the hinge on the left (this rebar rail allows panels to have a low winter angle and be propped up into a summer angle) the drop was significant. That’s one of the repairs finally coming off the checklist (List Of Things to Do or LOSTD).
Simplified Wiring
Not to “lay no bummers on you” but it’s looking to us like the odds are rising that somewhere this year, nuclear weapons may “come out of the closet.” And when they do, the odds then quickly rise that America will experience the bitter results of an Electro-Magnetic Pulse (EMP) attack.
Like fire prevention, the time to “do something” is not when the house is burning, but to design more robust systems well in advance of needing them. Hence, in this article and more to come on hydroponics, our focus will be on making key changes to our personal infrastructure in the name of enhanced resilience.

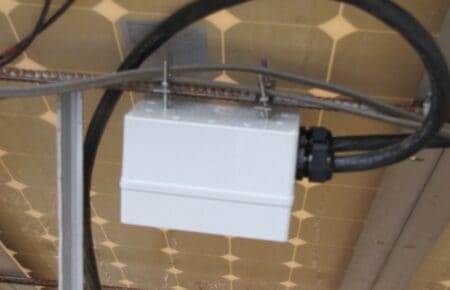
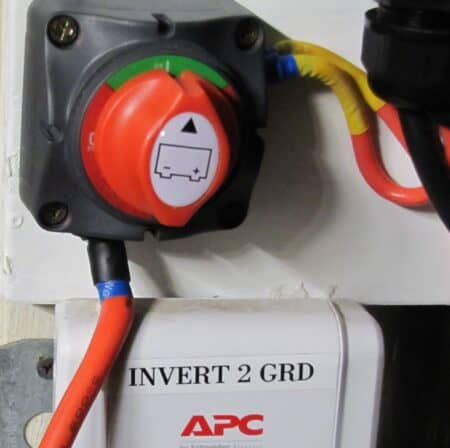
Two major changes related to our “aisle 3” work this week were changing out the cheapo automotive battery switches used for the original panel disconnect while also updating our charge controller strategy. Let me show you the dual 100-amp panel disconnect switch that went in first.
Two reasons for putting this in, the first of which is metal enclosures are a good thing. The second is it gave me a ground bar to which additional RF system grounding can be added.
This is an especially vexing area – this matter of “grounding” because just “connecting to Earth” isn’t the point, in most cases. While in “earthing” (the Brits use the term) is what you are after for lightning protections, in EMP you are more concerned with the low-frequency radio pulse. Most EMP energy is under 10 MHz. The NEC (last time I looked) was very specific about single point system grounds for AC house wiring.
Theory seems to go that if you have two AC grounds, say one at either end of the house, then if you had a neutral (white wire) failure, and at the same time the green ground wire opened, THEN you could have a “hot ground” which would be dangerous. Only if the power was still on…but I don’t write the Code. I just try to see what they’re getting at.
RF (the radio frequency ground) is designed to dissipate radio noise pulses and the best way to do that is to tie multiple ground radials (each >70-feet) out every 10-degrees of the compass from a vertical antenna, for example. Or, in the case of a horizontal antenna, you would have parallel RF ground wires either buried, or above ground as an NVIS (near vertical incident skywave passive ground reflector) depending on the take-off angle planned for your antenna design.
Anyway, I previously had a small metal box and now I have this dual 100-amp disconnect marvel wired in.
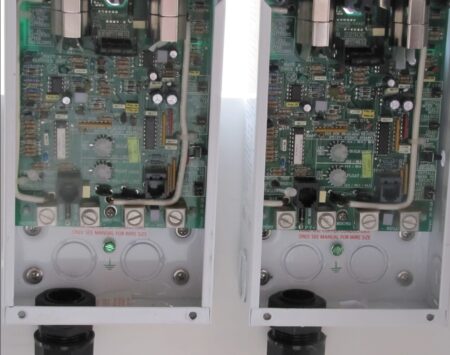 Which gets us to the second design change. I decided to go with split load simple (analog) PWM controllers instead of less robust (to EMP by my reasoning) MPPT (maximum power point tracking) microprocessor-controlled charge controllers.
To effect this change, a pair of (from the Faraday garbage can) out came a couple of NIB Trace C-40 charge controllers. Since my “aisle 3” of panels are used and will “only” put out about 1,900-watts, being able to handle 80-amps at 28-volts will be just fine. Oh, and cheap.
This is not a formal engineering study, merely a “parts count calculation.” There are a lot fewer things to go wrong in one of the C40’s compared with the MPPT-type Isome call them MPTP). They are smaller and (to simple me) the lines of code are a risk. Because in the event of an actual EMP event, seems logical you’d be depending on the integrity of a flash-ROM part and, er, not too keen on that in a pulsed world. Cautious Luddite, that’s me.
A Useful Tip or Two
Working with the wire on this project has been a trip. It’s 3-strands of #4 plus a #6 ground wire. All in one plastic direct burial casing that’s a decade and a half old.
Which means? This stuff is a 24-karat bitch to work with. So here’s the two useful tips:
Tip #1 Old Hard Wire Cutting. I had purchased a pretty good slug of this wire and have been using it for all kinds of heavy wire projects around here. For example, a run from the ham radio tower over to the radio grounding field – 40-50 foot run my consigliere helped me dig in over Thanksgiving.
When I cut that (miserable old hard) wire then, I used a 3-foot bolt cutter. It worked, but it’s not easy and at 75, by-God easy counts for a lot.
The new and improved cutting? I put a hacksaw/metal-cutting blade in the battery powered portable zip saw (this one). You’ll expend a little effort holding the wire from moving, but compared to working overhead with heavy bolt cutters? Yep, this is my favorite trick.
Tip #2 Old Hard Wire Stripping
The main part of this tip is “Heat the wire before stripping.”
Done in the shop, at the bench, a simple hand-held plug-in heat gun on high for half a minute will turn the insulation extremely soft and cooperative.
Outside, where presumably you have less risk of fire, a small Bernz-o-matic type propane torch will work great.
With a little focus, you can do pretty good work if you just take your time.
Two for the Road
It is probably total overkill, at least when just turning up the revised and improved solar system, but I did take the time to put on good copper battery fittings and then soldered them.
Most people don’t know this, but annealed copper will continue to flow over long periods of time. I have heard from DC power electricians that you can pick up sometimes 10-percent, or more, from old panels by simply clearing up the wiring issues. Compression fittings are fine (and expedient as hell) but in the long run they need to be serviced.
I’m also a fan of having an electrician (if you aren’t comfortable doing the job yourself) go through your entire home’s electrical system every 10-years, or so. You’d be shocked (bad pun, sorry) at how many connections will give an eighth of a turn (and more) when properly snugged up to new specs.
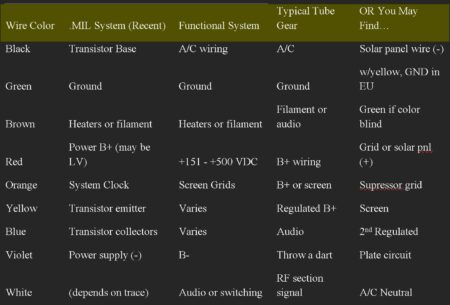
 The second thing to keep in mind is the use of heat shrink tubing in an assortment of colors. You can make some mighty professional looking wiring with a few tie-wraps to add some neatness to the job, along with bands to inform anyone who comes along later what the various wires are for. Red is for DC hot, black is DC ground. Green are system grounds, and blue is the battery plus in my system. Knowing this, next time I go through and do solar wiring maintenance (I will be 85 then, lol) having strict adherence to a color-coding scheme in life will be very useful.
In the military (and not many people know this) wire colors are very indicative of what is being carried.
This attention to detail is the kind of “little thing” that separates a serious maker from a kluger. And you don’t want to be one of those, now, do you?
Now, go bang something,
George@Ure.net
Red is for DC hot, black is DC ground. Green are system grounds, and blue is the battery plus in my system.
Don’t forget red is also hot in 3-phase wiring, and in 3-way and 4-way lighting switches. 3-conductor Romex will have black, white, RED, and bare or green…
“The second thing to keep in mind is the use of heat shrink tubing in an assortment of colors. You can make some mighty professional looking wiring with a few tie-wraps to add some neatness to the job, along with bands to inform anyone who comes along later what the various wires are for.”
Something else that’s, in some cases, even better than heat shrink is Gardner-Bender HTP-1010 self-sealing silicone tape. Stretch to activate, then wrap with an overlap and you’ve got a MIL-SPEC high-temperature waterproof seal. I use it both to build wiring harnesses, and when I have a “T” or “X” splice which must hold that shape. It’s better and cleaner than Liquid Tape (or Liquid Tape + heat shrink), has better integrity, and it’s much faster…
https://www.amazon.com/dp/B00004WLKT
Yeah yeah military color code wire menu..must be nice for the military minded electricians, but for regular folk, down south of the US border..any color will do for any lead. I have seen houses down here with 3 different Sets of color coded wires in use. A ton fun of trouble shooting shit when Ure tracer signal is jumping color lines, at least they are solid colors..and not paired.
I think there is a valuable How To book in Ure back yard solar project.
Outback Solar
How To Redneck Ure Whole House Solar Project, while having fun and making money
Author: GURE-all ages appropriate.
“To effect this change, a pair of (from the Faraday garbage can) out came a couple of NIB Trace C-40 charge controllers.”
I’m leaving mine in the cage until they’re needed. I’m less afraid of a little down time than I am, a second, “killing wave” of EMPs, popped-off a few days after festivities begin. Your column did prompt me to buy a spare…
https://cults3d.com/en/search?q=Crossbow
Seen this on the slingshot channel about a 3d printed crossbow..wow..
Hey George, Bunnee’s husband here. (you may remember we visited you and Elaine several years ago, as we live right outside Palestine)
Anyway, as another Olde Farte always looking for an easier way, here’s what I do when needing to cut heavy electrical wire:
Instead of a zip saw I use a cutoff wheel in a hand-held grinder. Works good for cutting metal also. Easier than hacksaw also.
Great idea Ed! Thanks! Will use it often!
Tell Bunnee Hi for us, too!
Got more projects can a dog has fleas going…
Ditto. Makes holding the wire a non-issue…
My kids joke that if I need a tool it’s an angle grinder! I use the little 4.5″ units with a cutoff wheel for almost anything they can be used for. A battery operated unit is good out in the field, including Pull-N-Pay. It’s so much easier than using alternative tools. It’s not so great with wood, though it cuts wire, insulation, plastic and metal without missing a beat. Larger units 7″ and 9″, are better if you’re dealing with masonry.
‘Not to “lay no bummers on you” but it’s looking to us like the odds are rising that somewhere this year, nuclear weapons may “come out of the closet.” And when they do, the odds then quickly rise that America will experience the bitter results of an Electro-Magnetic Pulse (EMP) attack.’
Nostradamus Epistle: Paragraph 32:4
Who will make such an abominable breach in the Churches that neither the reds nor the whites without eyes nor hands will know what to make of it.
TRANSLATION: Nostradamus Epistle: Paragraph 32:4
Neither Christians nor Muslims, without communications or mobility, will understand what is happening to them.
Nostradamus Epistle: Paragraph 32:5
And their power will be taken from them.
TRANSLATION: Nostradamus Epistle: Paragraph 32:5
Their technological power will be taken from them.
Source: theageofdesolation.com
You got it JC – that’s the line kept whirring in my head, too. “power will be taken from them.”
Them is OK (ish). But we have no desire to be “in the them.”
Change out the heat pump breaker(s) if it’s been more than a decade. With the current rapacious cost of HVAC, it’s a cheap project and takes less than 5 minutes. Maybe the well pump too, another inflated $$$ area. Yearly inspection of panels a good idea. Had a neighbor, was an electrician, I would trade maintenance on his lawn gear for checking and replacing wear items like sockets and breakers.
Damn good point, Scott. If I had been thinking about it, the 60 Amp out at the 5 ton A/C which cost me $250 for a new breaker (and capacitor) could have been a lot cheaper.
Bought a suitable BoJack starting cap on Amazon for under $40 and the new breaker should be good for two to 7 years…but great items to have on hand.
One of the first things you posted here was my list of links. Breakers, starting capacitors, and the like are much cheaper at Surplus Sales than Amazon, and are likely to even be made in USA…
When I bought the Volcano Ranch, I changed every (40 year old) electrical outlet in the house. Unbelievable… paint spattered contacts, loose ‘shove-in’ connections, and cross-polarized connections. With the install of the solar system, it required a new meter panel and new distribution panel for the house also. So I’ve got new connections everywhere. I added power factor capacitors and MOV surge protection at the distro panel, also.
Got a good source on the PFCs and how much and where to buy? How a layman can measure, etc
(like do an article don’t be a tease@@@)
“Shotgun Approach”. I measured nothing! I found some chinesium ‘power factor modules’ on eBay that consist of a 3.34uf capacitor rated at 250 volts with a series fuse and indicator LED that I put from each 120vac leg to neutral. I guess the assumption is that most households are primarily inductive loads like motors. Even LED lights with their electronic drivers are inductive. Anyway, they seem to have lowered my power bill average maybe 20% so I guess they are working. Shortest article on record!
Got a seller name or link?
No trace of the seller. This was several years back. There are now plug-in units that are likely the same thing… small power factor caps across the line, similar to this:
https://www.ebay.com/itm/134705562226?hash=item1f5d13c272:g:NDoAAOSwOa1k65jX
Mine was housed in a small alum. extruded box with about a 12 inch line cord. I cut the plug end off and wired it in with the MOV terminals. Like I said, it is a ‘shotgun’ approach making generalized assumptions about your average home power factor. Apply some correction and see if it helps. Your results may vary. Void where prohibited.
My power company(COOP) claims that they don’t bill on KVAH, but on pure KWH for residential.
Presuming that’s true, the PFC units should make no difference on the bills, though there may be a benefit to the appliance motors.
Well done George. I used uni strut to build a frame and mount for a small solar unit I use away from the shop. Welds did not take the weather well so I ended up rebuilding it and using Mig rather than stick welds followed up with a couple coats of primer and john deer green paint. Crap, now I’ll have that song in my head all day.
Stay safe. 73
I was just getting used to the Lincoln SP-135 on the first two racks on the first H rack. By the 3rd weld, I was hitting my stride again, but it had been 40-odd years between.
That’s why like flying shop skills need to be brushed up all the damn time…
Agreed. I use the heck out of the cheap Klutch 140 MIG welder I picked up a few years back.The big Forney in the shop gets jealous. From what I could see in your pics you did a good job especially if you were on site away from the shop.
You didn’t think I would show my worst weld, did you?
You would if you were trolling for a sympathetic first-class welder.
LOL (humbled)