
Process Rules
If you’re new to 3D printing, one of the most important things to remember is “There’s very little art” and a whole boat-load of critical thinking and science involved in making 3D prints. Process rules in this pursuit.
I thought it would be useful next to roll through some common “first time learning” for each step of the 3D process.
Designing Things
The 3D (and CNC pattern) search engine Yeggi.com is a gem. Many of the items you will want to build can be searched there.
Having indexed things like Thingiverse and Cults, it can save you a lot of time if you’re looking for a design.
Example: I have recently acquired some “special” ham radio wire for a specialized antenna. While there are lots of sources of ham radio antenna parts online, NONE have the odd spacing of this particular steel core copper antenna feed line.
This means I have to design something in TinkerCAD.
To do this effectively (and quickly) what is your design process?
The one I try to follow is pretty simple:
- What is the problem we’re trying to solve?
- What would the perfect solution do besides this?
- What can I add that would be a real value-add?
- How can I print it most effectively?
This may sound a bit formalized, but it’s important for us to organize our thinking, rather than for it to “organize us.”
In the example, applied to this antenna (and wire):
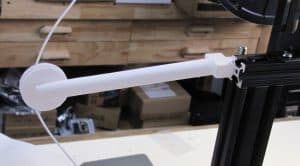
- The problem is this wire will run from the side of my office over to some trees. It needs to be secured at both ends.
- The graceful solution would not be to use a plastic electric fence insulator, but instead make something that would hold tension on the wire nicely.
- The value-add would be if the attachment method would work equally well into wood (like a 2-by 4 – or into a large 18″ diameter tree. So the attachment side ideally would be 8 inches long and have 3 screw holes in it for strength and redundancy.
- Effective printing would minimize in-fill. (Where your slicer leaves “air” in order to reduce filament used. I had purchases a plastic commercially-made design some months back. It failed in high winds, though. When inspected, the failure was revealed to have been in the in-filled area where the “honeycomb” inside the overlaying plastic just wasn’t strong enough.
See how this works? Design is the ideation of a graceful solution into something you can draw.
CAD Tricks
The one required bit of learning for making easy work of TinkerCAD is to remember that the arrows in the normal mode are X-Y. If you need a part (or a void) to be moved up or down, hold the CTRL key. That’s really the only big deal in TinkerCAD. You’ll eventually get to close tolerance parts dimensions but to begin with? Easy is how we roll!
Remember in TinkerCAD to download where you can find it… Save as .STL.
Slicing
No real secrets here, other than pick the right printer from the menu in Cura slicer setup dialog when you are doing the set-up. This will ensure that the object you’ll slice will fit in your printer’s build space.
If you try to slice something too big for your printer, you’ll need to fix that error.
Printing
Number one glitch that most people run into is filament tying itself into a knot and refusing to print.
To solve this problem, make sure you never let loose of the free end of your filament.
As explained in this video, filament will generally feed just fine – right off the factory roll – IF you don’t let it get under another strand. Watch this video and you’ll be hugely smartified!
If you keep control, there won’t be any knots.
Go ahead, ask us how we know?
New Product Idea
Speaking of filament, one of the “major pains” is what to do with short lengths of filament from a 2.2 pound spool.
Although there are a number of “filament welding” jigs (holders) on Amazon and elsewhere, we haven’t seen anything near an ideal tool.
Again, going back to design? The best ideas and designs come from the best articulation of the problem.
Since we can see the problem, what would be the graceful solution?
A device that will clamp over (for easy removal) two pieces of filament. Then heat the joint until it flow (200 C for PLA, for example). And quickly cool. If you want to get famous, hit the $60 price point with that and let us buy the first one!
Filament Required
Cura – the recommended slicer around here – will give you an idea of how much filament will be needed for a particular print.
But, this is where having a small kitchen digital scale comes in.
If your software says you need 600 gm to print something, then you will want 20% more than this (just in case). Which means 600 times 1.2 = 720 gms.
Process:
- Weigh empty spool from specific manufacturer. We like populat filament brands like Hatchbox, then Overture, then Sunlu in that order and each has a slightly different weight of empty spool. Grab an empty (they will begin to pile up!)
- Place empty on the small digital scale and hit “zero”.
- This sets was called “tare weight” – zero contents and the weight of container removed.
- Then put on the partially used spool. Note weight.
- If it weighs 720 gms, odds of enough for the print are high.
But…
Not All Filaments Are Equal!
If you don’t believe us, do a print with Hatchbox and some xyz brand on sale.
Odds are good that when weighed, the Hatchbox will be heavier.
In general, the heavier the filament, the stronger the print. So keep a log book and notice what weights are for the same print when running multiples.
How Much Off a Roll?
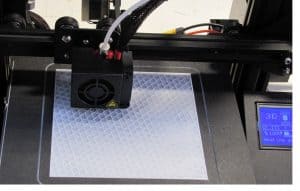
Certainly this isn’t definitive, but here’s an assort of prints from less than one roll of Sunlu White PLA:

As you can see, an assortment of things: Spool adapters, a storage tray, a couple of parts boxes, a fan cover, some doo-dads. A nice desk name tag for my wife (Elaine Ure – Author).
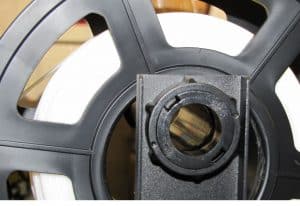
Oh! AND that doesn’t include the filament guide I printed:
And it doesn’t include a second desktop organizer box…which was printing at the time the camera wandered by…
Even so, there was this much filament left on the spool:
Eventually, I printed 3 decent boxes and had enough left for some cable clips.
Your mileage will vary, but have fun with it. And remember to send in pictures of your designs and tell us about your experiences so we can share.
3D printing is a great community (like ham radio is) thanks to people like you…
George@Ure.net